
Farmhouse Style DIY Dollar Tree Coasters
You’d be surprised how many Dollar Tree crafts you can make to decorate your home! Even if you love farmhouse style, you can find tons of great craft supplies to make your own DIY decor for a fraction of the price it would cost to buy them in the store. These DIY Dollar Tree coasters are a great example of how easy it is to transform dollar store items into rustic decorations without much time or effort.
This post contains affiliate links, which means I may earn a commission if you purchase something from my link (at no additional cost to you). Thanks for your support!

I love how easy these dollar store coasters are to make! With the help of your Cricut, you can transform plain wooden coasters into rustic farmhouse decorations in a matter of minutes.
Looking for more rustic craft ideas? Check out my Farmhouse DIY projects to see more Fixer Upper crafts you can make for your home today.
The best part about this simple craft is you can use any of the different styles of wooden coasters in the dollar store to make it. Whether you grab the pallet coasters that I used a set of square wood pieces, the instructions will fit perfectly with your craft.
DIY Dollar Tree Coasters
What I love most about these DIY Dollar Tree coasters is that you only need five craft supplies to put them together. And one of those supplies is the coasters themselves!

To make this quick and easy DIY decoration for your home, you’ll need:
- Wood coasters: I found these wood plank coasters in the craft aisle of my Dollar Tree! They also had square wooden coasters that would work perfectly for this craft project.
- White paint: I used white chalk paint to paint the wood on my coasters, but any type of paint or stain will work with this easy project. Just pick the color or style that matches your current decor.
- Black vinyl and transfer paper: Any black vinyl and transfer paper will work for this project! You can even find black vinyl at Dollar Tree now!
- Home Sweet Home SVG file: Keep reading to see how to get your copy of this free Home Sweet Home SVG file to make your own coasters at home.
- Cricut: To cut the words for your wooden coasters, you’ll need a cutting machine to cut the vinyl. I use the Cricut Explore Air 2 and love it!
Home Sweet Home SVG
To transform your wooden dollar store coasters into rustic farmhouse decorations for your table, you’ll need to use my free Home Sweet Home SVG to add to your project. Keep reading to see how to grab your cut file to use with your Cricut.
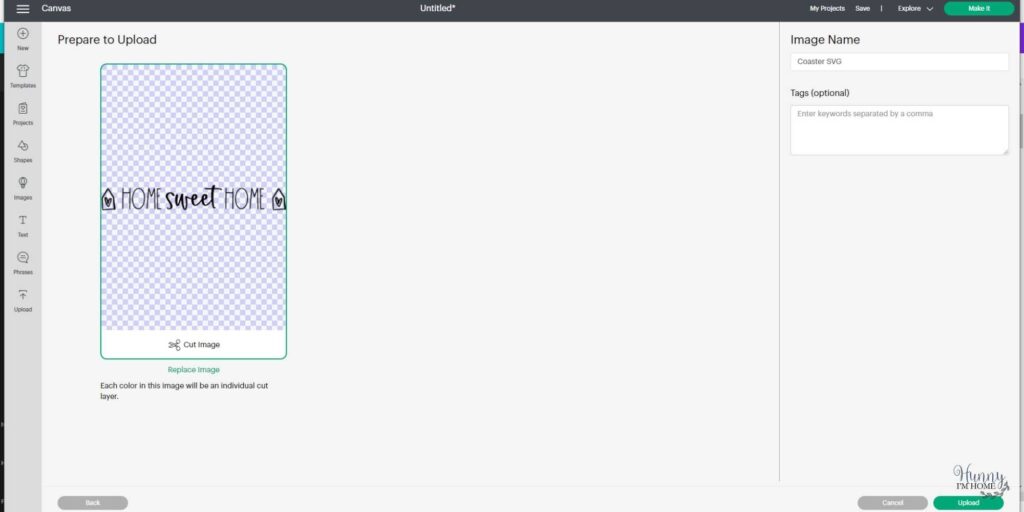
To make your own DIY coasters, you’ll need to download free SVG cut file. To get your own, simply subscribe to my email list, unzip the file, and upload the SVG into Design Space.

AFTER SUBSCRIBING, YOU’LL RECEIVE A WELCOME EMAIL WITH A PASSWORD EXCLUSIVELY FOR MY SUBSCRIBERS. IF YOU DON’T SEE THE MESSAGE SHORTLY AFTER SUBMITTING YOUR CONTACT INFORMATION, BE SURE TO CHECK YOUR JUNK OR SPAM FOLDERS AND ADD MY EMAIL AS TO YOUR SAFE LIST! I’LL KEEP YOU UP-TO-DATE ON NEW FREEBIES AND OTHER POSTS once a week AFTER THAT.
After you have downloaded your file, you’ll need to unzip the folder to access your SVG. Simply extract the file from the folder, then you can upload it directly into Design Space.
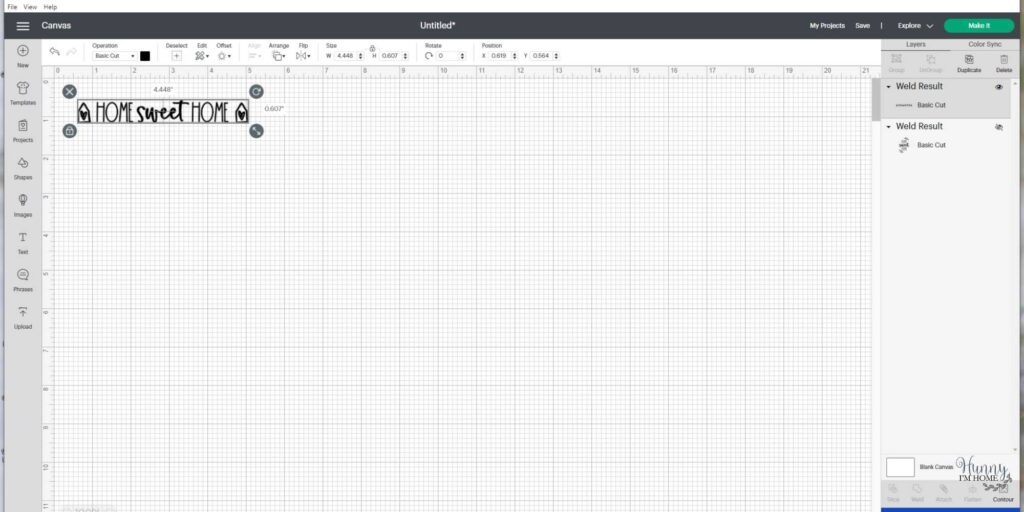
Once you have the design added to your workspace, start by selecting all the elements of the design and welding everything together. After that, you can resize the design to fit on your coaster.
If you’re using the same Dollar Tree coasters as I did, your design should be around 4.5 inches long to fit on the wood slat.
After the design is welded and resized, you can place your black vinyl on the cutting mat and cut the design.
How to Make Coasters at Home
Once you have your SVG file downloaded and the vinyl cut and ready to go, you can start prepping your coasters. Follow these instructions for turning plain wooden coasters into some cute farmhouse decorations for your home.

Before you start painting your coasters, I suggest using a piece of sandpaper to quickly smooth out each piece of wood. My coasters were pretty rough, so the needed to be smoothed out a little bit in order for the paint to look smooth.

After sanding your coasters, paint a few coats of white paint over the top of the wood. Just continue adding coats until the wood is completely covered. Then, allow the paint to dry completely.

While your paint is drying, use your weeding tool to remove the extra vinyl from around the design. Then, place a piece of transfer tape over the top of the vinyl to make it easier to transfer the words from the backing to the coaster.

Once you have your tape lined up, place the design on the bottom rung of the coaster, making sure to line it up in the center. Then transfer the vinyl to the coaster. And thats it! How easy was that?
Dollar Store Coaster Craft Tips
This easy farmhouse coaster craft is so easy to make! But if you have questions or issues as you’re crafting, keep reading! I have some quick suggestions for you to make this simple craft even easier!

These simple tips will make this DIY wooden coasters so easy to make:
- Seal the coasters with wax. If you’re using chalk paint to paint your DIY coasters, I suggest using chalk paint wax to cover the paint when you’re finished. Wax is a great way to seal your paint without taking away from the rustic matte finish that chalk paint provides. To seal your coasters and make them water-resistant, spread a think layer or two of wax or polyurethane over the top of the coasters. Allow them to dry completely before using.
- Add a more rustic look with stain. If you’d like to make your farmhouse coasters look more rustic, try staining the wood before you paint it. Then, after the paint has dried, use sandpaper to distress the coasters before you add your vinyl.

Dollar Tree Coasters
Turn plain dollar store coasters rustic farmhouse decorations with the help of your Cricut and a free SVG.
Materials
- Dollar Tree wooden coaters
- White paint
- Black vinyl
- Transfer tape
Tools
- Paintbrush
- Cricut
- Weeding tool
Instructions
- Paint the coasters with white paint and allow the paint to dry completely.
- Upload the SVG file into Design Space and resize, if needed.
- Weld the letters together, then cut the design on black vinyl.
- Weed the excess vinyl from around the design and place a piece of transfer tape on top.
- Transfer the design to the coaster.
More Fun Farmhouse Craft Ideas:
Simple Rustic Farmhouse Centerpiece
Easy DIY Farmhouse Candle Decor
If you like this post, you’ll probably like these:


Emily is a midwestern mom of two boys. She loves all things DIY — from home renovations to kids birthday party planning. Whether she’s making a new farmhouse craft for her home or helping her kids with a cool activity, you can bet she’s in the middle of some kind of DIY project (or three) right now!


Well this looks like a quick and simple project. It’s fun to make things ourselves if we have the time.
Thanks for sharing your idea at the Homestead Blog Hop 389
Laurie
Ridge Haven Homestead