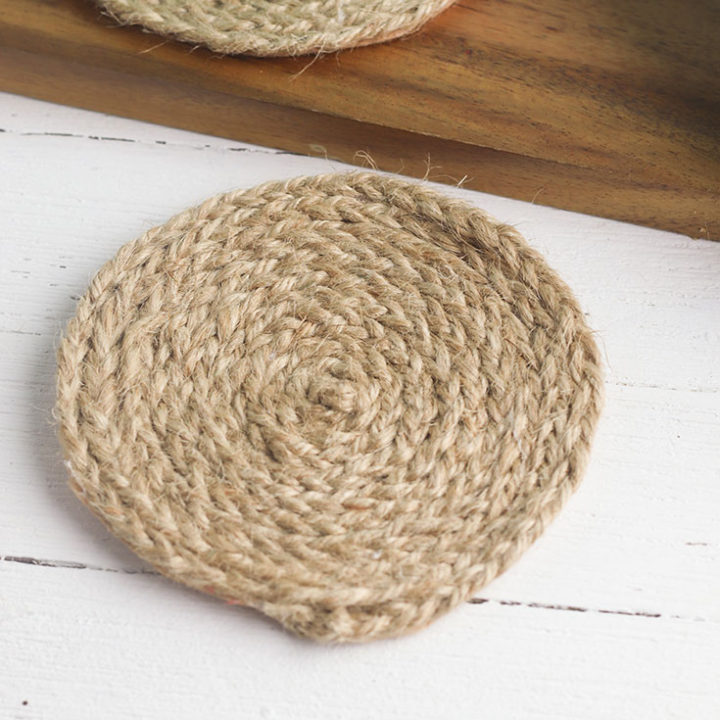
Farmhouse Style Braided Jute DIY Coasters
I just love functional home decor — especially when it has DIY farmhouse style. Coasters are a great way to add some decor to your tabletops while also protecting them at the same time. And making your own DIY coasters is so easy! To make these simple braided jute coasters, all you need is jute twine, felt, and glue.
This post contains affiliate links, which means I may earn a commission if you purchase something from my link (at no additional cost to you). Thanks for your support!

These DIY jute coasters are to easy make! They’re simple enough for a kid to help with or easy enough to make while you’re watching your favorite show.
Looking for more farmhouse craft ideas? Check out my rope wrapped vase post to see another simple rustic craft you can make for your home.
Supplies for Your DIY Coasters

To create these rustic jute coasters, you’ll need:
- Felt
- Jute twine
- Hot glue gun
These DIY drink coasters are not only so simple to make, you also probably already have everything you need to make them at home! So, grab your supplies and start braiding!
How to Make DIY Drink Coasters

To make your own DIY drink coasters, you should start by cutting felt for the bottom of the braided jute coasters. Use a small bowl or large cup to trace a circle around a piece of felt, then cut out around the outline. Felt is a great choice for the backing of your drink coasters because it helps keeps the coasters from slipping when they’re sitting on a smooth surface.
When you have your felt cut and ready to go, it’s time to start prepping your jute twine. You’ll need three very long pieces of twine to make a braided jute coaster. I suggest cutting your twine around four feet long. It’s better to cut your twine too long than too short. YOu can always trim the ends off your twine, but it’s hard to add to the twine once it’s cut.

Tie a knot on the end of the three pieces of twine to secure them together, then start braiding. As you’re braiding, you’ll probably notice that the twine will start to knot up if you’re not careful. After braiding a few passes, take a second to run your fingers through the length of twine. This will help prevent knots and keep your twine from tangling as you braid. Just keep doing this process (braiding and untangling) until the twine is braided about halfway down the length of twine.

When you’ve braided half of your twine, use the hot glue gun to glue the knot at the end of your braid in place. Trim off the ends as close to the knot as possible.

Then, start wrapping your braid around the knot to create your DIY jute coaster. Add glue under the braid as you wrap to secure it in place. Continue gluing and wrapping until you’ve reached the end of your braid. Then, braid some more and start wrapping again.
Keep braiding, wrapping, and gluing until you have reached the edge of your felt.

Once you’re at the end of your felt, you can tie a knot in the end of your twine. Trim the end of the twine off as close to the knot as you can, then fold the knot under the last layer of braid and secure it in place with glue.

Finish your DIY coasters by trimming any excess felt you can see from the edge of the coaster. And that’s it! See how simple these farmhouse coasters are to make?! These rustic DIY braided jute coasters will look so great with the rest of your farmhouse decor!
Braided Jute Coasters
Make your own farmhouse style braided jute coasters at home with just a few simple supples.
Materials
- Felt
- Jute twine
Tools
- Hot glue gun
- Scissors
- Pen
- Small bowl or cup
Instructions
- Trace around the small bowl or cup using a pen on the felt. Cut out each circle with scissors and set aside.
- Cut three five-foot pieces of jute twine. Place the ends of the twine evenly together and tie a knot in the end.
- Braid the length of twine and knot the end to secure the braid in place.
- Cut off any excess twine at the end of the knot and glue the knot into the center of the felt circle.
- Wrap the braid around the knot in a circle, gluing the braid in place as you wrap.
- Continue wrapping until the entire felt circle is covered.
- Cut off excess twine and glue the ends under the last layer of the coaster.
- Cut off excess felt from the edge of the coaster, if needed.
More Fun Farmhouse Craft Ideas:
Simple Rustic Farmhouse Centerpiece
Easy DIY Farmhouse Candle Decor


If you like this post, you’ll probably like these:


Emily is a midwestern mom of two boys. She loves all things DIY — from home renovations to kids birthday party planning. Whether she’s making a new farmhouse craft for her home or helping her kids with a cool activity, you can bet she’s in the middle of some kind of DIY project (or three) right now!


These are adorable! I never guessed they would be so easy to make. I might make a bunch for birthday or Christmas gifts. Thanks for the idea!
Ooh… I love DIY, especially when you break it down like that and they come out that good. It’s a good craft to try during this time. And I definitely love your blog name!
These coasters are amazing! They would be fantastic for my patio area. I’m always looking for my next diy too.
These are adorable! They remind me of the Jersey Shore for some reason! Good memories of my childhood!
So cute, and yes, I have all of the supplies at home.
This is the perfect thing to make with all that jute I have lying around!
It’s so simple but turns out so good
These are great! I was looking for a simple coaster to make to use on our glass patio table and these would be perfect! So happy I found your site 🙂
Love this idea! I do have a question: If you use as a coaster for a hot coffee cup, will the heat melt the glue?
I haven’t had any issues with the glue, Christine. I think since it’s under the jute, the heat doesn’t really affect it!
Nice guide! Have you tried to sew jute coasters instead of gluing them on paper? Should be more reliable. You can also dye the rope with natural colorants (or any textile colorant will do the job even easier). Cheers, Anna.
That’s a great idea, Anna! I’m not much of a seamstress, but I bet it wouldn’t be difficult to sew the braided jute onto the felt.
Emily, do you have a sewing machine? If yes, you even can remove the felt from the process, the easier option would be to put stitches onto two neighboring pieces of rope, not rocket science either. Sounds harder than it is, here is a short video showing the process:
1) https://www.youtube.com/shorts/vMF3Acdnspc
2) https://www.youtube.com/shorts/mrk2j7a6seM
Cheers! Anna.
How lovely, they look fabulous and seem so simple to make too. I wonder if you would like to join and share at our weekly linky, Handmade Monday. You’d be very welcome if you’d like to stop by 🙂
These are so sweet! And they look easy to make – thanks for sharing them with us! I will be featuring your post this week! #HomeMattersParty xx
Thanks so much for the feature!
Sometimes the simplest projects are the best. Love this Emily!
Thank you for sharing this sweet and easy DIY at Create, Bake, Grow & Gather this week. I’m delighted to be featuring your jute coasters at this week’s party and pinning too.
Hugs, Kerryanne
Thanks so much for the feature!
I really like this idea. I have some cork I need to use in my craft stash and this would be a great idea to make coasters with the cork instead of the felt backing. Either way, this is a great project. This post will be a feature this week. #HomeMattersParty
Thanks so much for the feature!