
DIY Dollar Tree Jenga Ornaments Craft with SVG
You can never have too many DIY ornaments on your Christmas tree! That’s why I love heading tothe the dollar store during the holiday season. There are so many great ways to use those budget-friendly supplies to make some amazing farmhouse decorations for the holidays. These Dollar Tree Jenga ornaments are a quick and easy way to add some rustic style to your tree. Grab your Cricut SVG to make these cheap decorations today.
This posts contains affiliate links, which means I may earn a commission if you purchase something from my link (at no additional cost to you). Thanks for your support!

You’re not going to believe how easy it is to make these wood block ornaments! And the best part is that you can buy one wooden block game from Dollar Tree for $1.25 and make tons of ornaments!
That means these Dollar Tree ornaments are one of the most budget-friendly crafts you can make this holiday season!
Dollar Tree Jenga Ornaments
You only need five craft supplies to put these ornaments together. And you can find everything you need to make them at the dollar store.
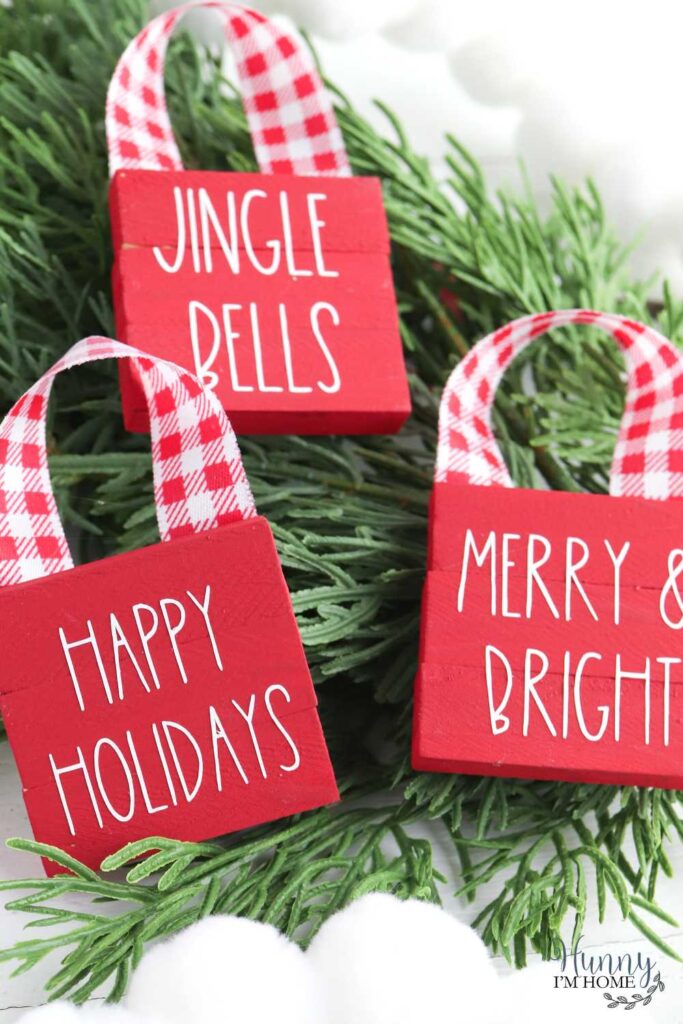
To make your own stack game ornaments, you’ll need just a handful of cheap craft supplies, including:
- Dollar Tree stacking game blocks or Jenga blocks. You can find this Dollar Tree stacking game in the toy section of the store. The blocks that come with the game are slightly smaller than traditional Jenga blocks, so you can decide which wood blocks you want to use depending on how big you want your ornaments to be. If you would rather use larger blocks, you can grab a Jenga game at any store, like Dollar General, usually for under $10.
- Popsicle sticks. I used popsicle sticks to hold my blocks together to give them a shiplap look. If you don’t have any popsicle sticks at home, you can just glue the blocks together and clamp them until the glue dries.
- Paint. My Jenga ornaments were made with Folk Art Tuscan red chalk paint. This is the only craft supply I didn’t purchase at the dollar store because I already had some at home. You can also find acrylic paint in the craft aisle at Dollar Tree in a variety of colors.
- Vinyl. To add the Rae Dunn inspired text to each ornament, I used white vinyl. You can now purchase vinyl from the craft aisle at the dollar store. But if you want a more high quality vinyl for your ornaments, I recommend Oracal white vinyl.
- Transfer tape. You’ll also need to use transfer tape to transfer the text from the backing paper to your ornaments. Try this transfer tape with grids to ensure your text is nice and even.
- Ribbon. I found my red and white gingham ribbon at Dollar Tree in the seasonal section. You can use any color or pattern of ribbon you want to add to the top of each ornament!
Free Christmas Ornament SVG
Before you can start putting your Dollar Tree Christmas crafts together, you’ll need to grab my free SVG cut files using a Rae Dunn font. You can use the free download to turn your dollar store staking game into adorable Christmas ornaments for your tree!
After subscribing, you’ll receive a welcome email with a password exclusively for my subscribers. If you don’t see the message shortly after submitting your contact information, be sure to check your junk or spam folders and add my email as to your safe list! I’ll keep you up-to-date on new freebies and other posts throughout the week.
How to Make DIY Jenga Ornaments
Turning a block stacking game from Dollar Tree into adorable ornaments couldn’t be easier! With the help of your hot glue gun and your Cricut, you can put together these cute decorations for your tree in a matter of minutes.
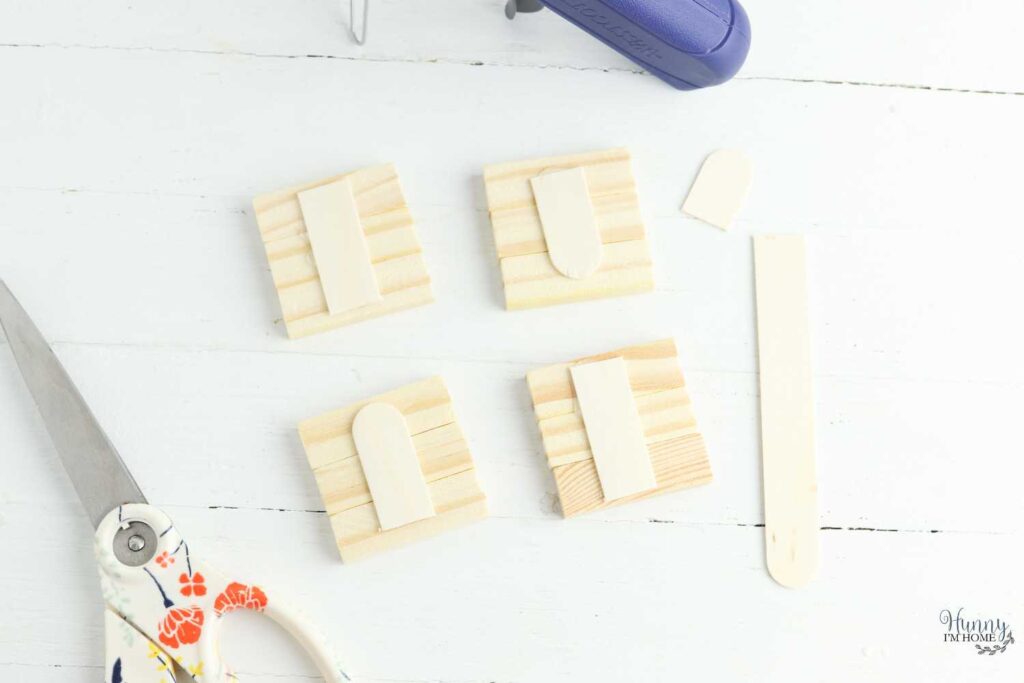
The first step is to make sure your wooden blocks are secured together. I like using popsicle sticks as a backing to help hold the stacked blocks. Just stack the blocks and make sure the ends are lined up. Then squeeze the stack together with one hand and add a line of glue along the back. Press a piece of a popsicle stick into the glue and hold it in place until the glue dries.
If you don’t have any popsicle sticks or want your back to look a little cleaner, you can also glue each block together in the stack. First, place a line of glue along the length of one side of a block and press another block on top. Then, add a line of glue on that block and press a third block on top. Pinch the three blocks together tightly until the glue dries or use a clamp to hold them together.
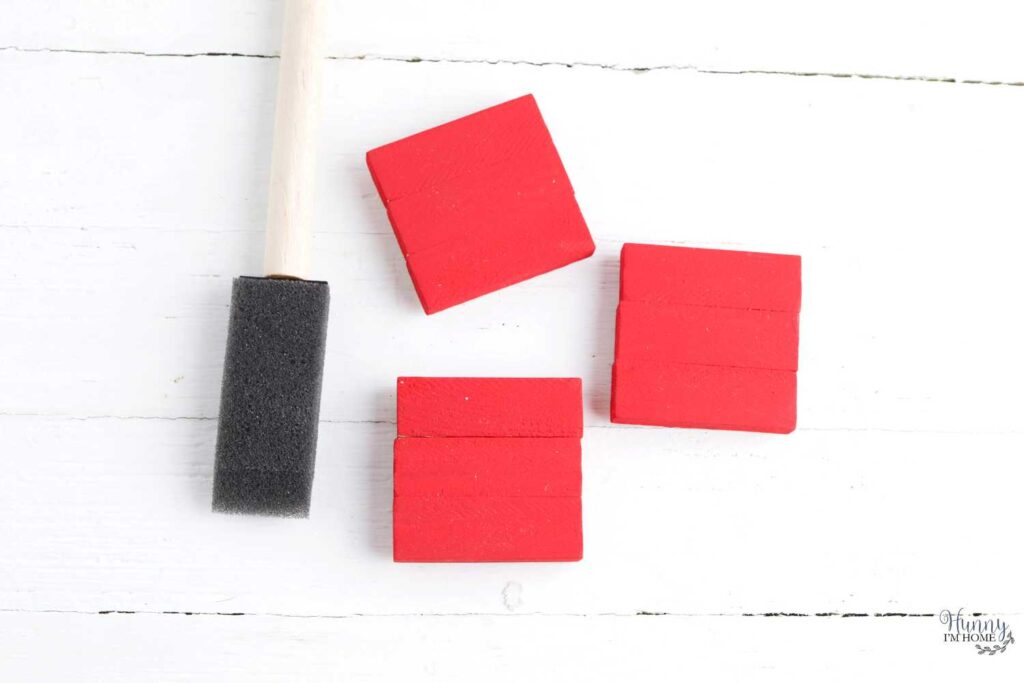
After you have all your blocks put together, make sure the glue is completely dry. Then, you can start painting. Brush the paint on the front and sides of each ornament, then allow the paint to dry completely. I suggest letting the paint dry overnight so that you’re sure it’s fully dry before you attempt to add your vinyl lettering to the top.
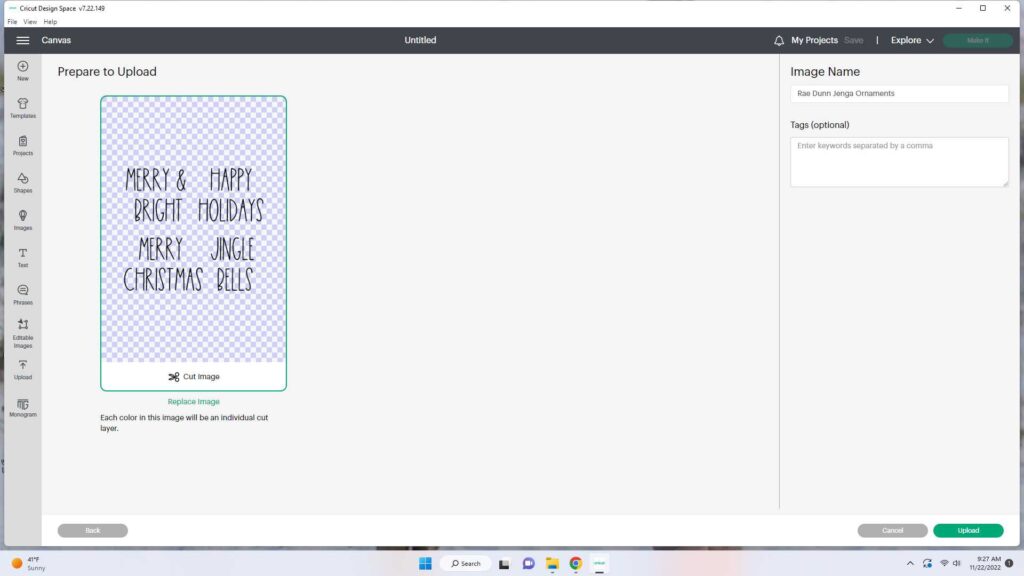
Once your ornaments are painted, it’s time to start adding your text! First, grab my free Christmas ornament SVG file. Then, upload the file into Cricut Design Space. The file should load as a cut image with a transparent background.

After uploading the SVG file, you can decide which phrases you want to use on your candles. Start by ungrouping all the letters in the file. After that, you can select the letters in each phrase and group each phrase individually. If there is a phrase you don’t want to cut, just select all the letters in the word or phrase and hit delete.
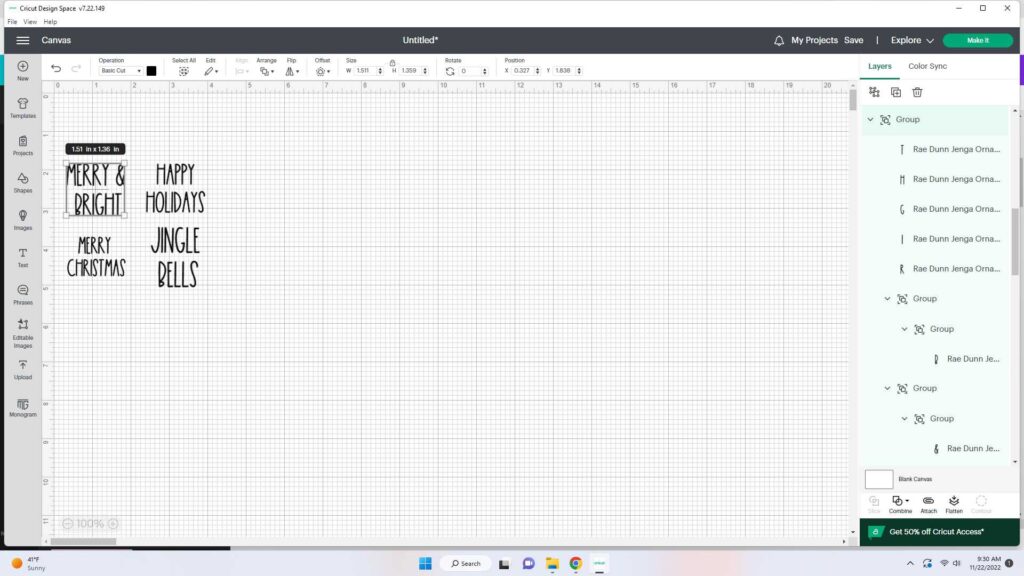
Once you have all your phrases grouped together, measure the space on the front of your ornament and resize the words to fit.
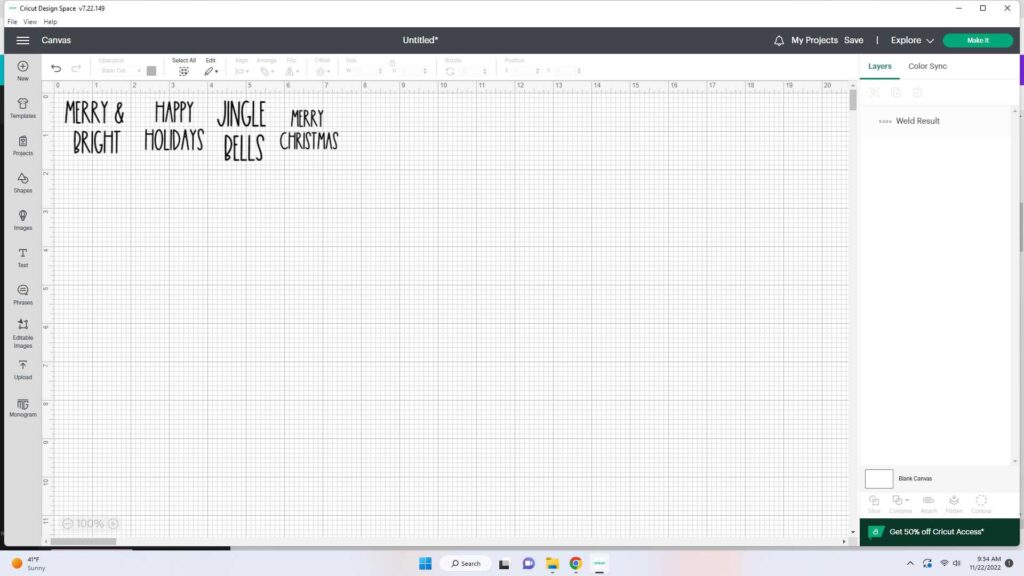
Then, select all the letters of each phrase and use the weld tool to blend all the letters together into one group. This will tell your Cricut to cut each word as a group instead as individual letters.
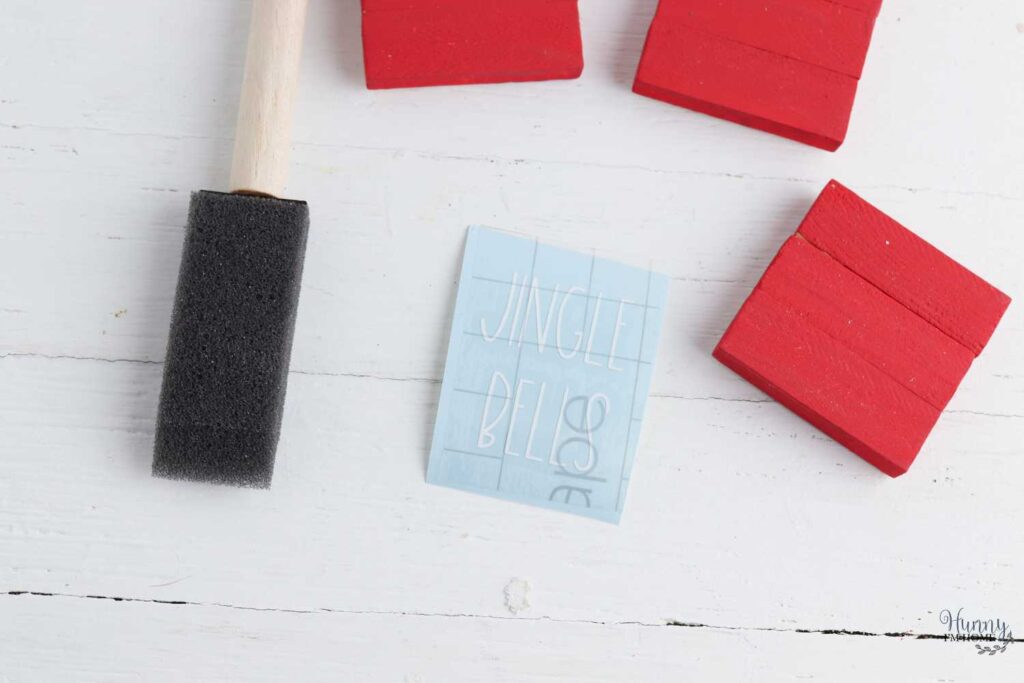
Once your design is set, load your vinyl into the machine and cut each design. Grab your weeding tool to remove the excess vinyl from around each word and place a piece of transfer tape on top.

Rub the top of the design with a flat object. I like to use my scraping tool, but an old credit card also works. Carefully pull the transfer tape off the backing paper and transfer the design to the front of your ornaments. Then, use your scraping tool to rub the vinyl onto the front of each ornament.
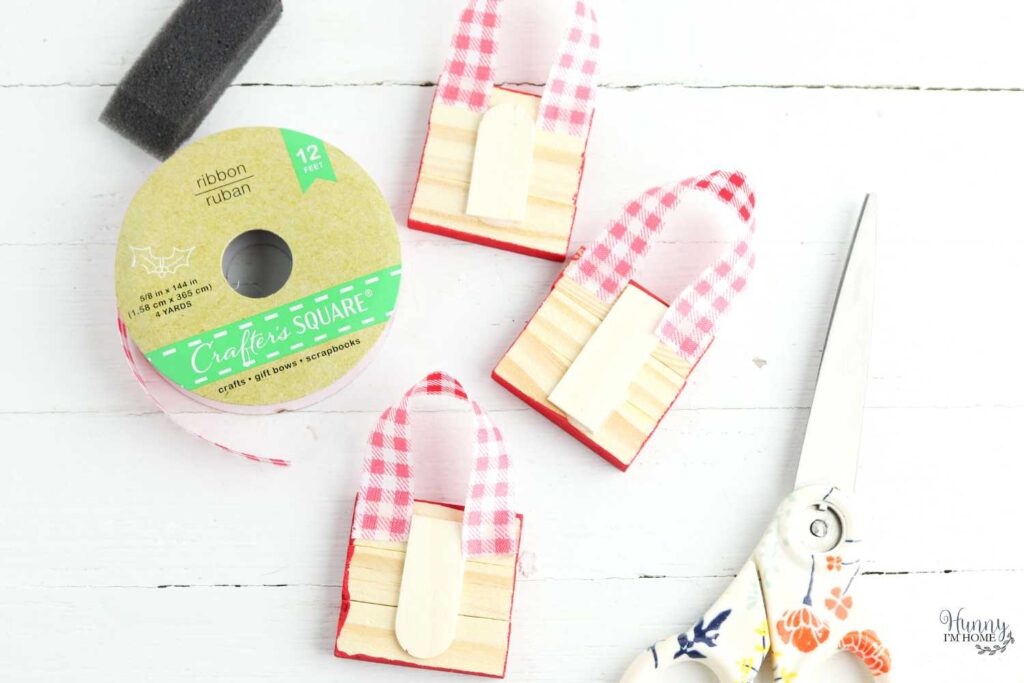
After all your text has been added, cut a six inch piece of ribbon and glue each end to the back of the ornament to create a loop on top. Then all that’s left to do is hang your DIY ornaments on the tree!
Dollar Tree Wood Block Ornament Craft Ideas
See how simple it is to turn a stacking game into some adorable farmhouse Christmas decorations?
On top of being a budget-friendly craft idea, these fun ornaments are completely customizeable! Try these craft ideas to create some unique decorations for your tree this year.
- Create your own text. You don’t need to use an SVG file to create some cute Cricut Christmas ornaments! Just use the fonts in design space to create your own text for your decorations.
- Write the text on each ornament. Don’t have a Cricut? No problem! With a paint marker, you can easily add your own text to the front of each ornament.
- Decorate with stencils. If your handwriting isn’t the best, you can also use stencils to decorate the front of your ornaments. You can find a variety of stencils at your favorite craft store or grab some Christmas stencils from Amazon!
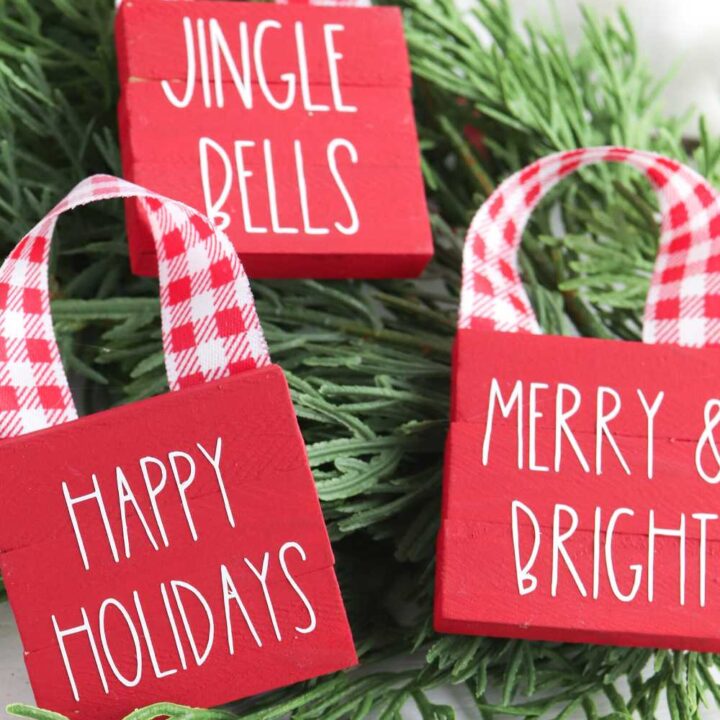
DIY Dollar Tree Jenga Ornaments
Turn a wood stacking game from Dollar Tree into farmhouse Jenga ornaments to decorate your Christmas tree this year with these SVG cut files.
Materials
- Dollar Tree stacking game blocks or Jenga blocks
- Popsicle sticks
- Paint
- Vinyl
- Transfer tape
- Ribbon
Tools
- Hot glue gun
- Scissors
- Cricut
- Paintbrush
Instructions
- Stack three wood blocks in a row. Cut a popsicle stick to fit the length of the blocks, then glue the stick in place to hold the blocks together.
- When the glue is dry, flip the blocks over and paint the front and sides of each block.
- Allow the paint to dry completely.
- To make the text for the ornaments, download the SVG file and upload it into design space.
- Ungroup all the letters and select each word or phrase individually. Group each phrase separately.
- Resize each phrase to fit on your wood block ornament, then weld the words together.
- Set the Cricut to cut vinyl and load the vinyl into the machine.
- Hit the Make It button and cut the phrases on the vinyl.
- Use a weeding tool to remove excess vinyl from around the words. Place a piece of transfer tape over the top of the word and transfer the text to the front of each ornament.
- Cut a piece of ribbon and glue each end of the ribbon to the back of the ornament to create a loop on top to hang the ornament on the tree.
More Easy Craft Ideas:
Dollar Tree Christmas Ornament Sign
Easy Rustic Christmas DIY Decorations
DIY Rae Dunn Christmas Ornaments
If you like this post, you’ll probably like these:


Emily is a midwestern mom of two boys. She loves all things DIY — from home renovations to kids birthday party planning. Whether she’s making a new farmhouse craft for her home or helping her kids with a cool activity, you can bet she’s in the middle of some kind of DIY project (or three) right now!


Hi, Emily! Your DIY Dollar Tree Jenga Ornaments are so wonderful! I was super inspired by your creativity and your photography skills. I would love to invite you to link up your project at Whimsy Home Wednesdays to inspire others and have a chance to be featured https://www.artsandclassy.com/category/diy/whimsy-home-wednesdays-linky-party/