My DIY Farmhouse Fireplace Makeover (for under $40!)
I just love a good farmhouse DIY project! I’ve been drooling over the beautiful painted fireplaces Joanna Gaines features in so many of her Fixer Upper makeovers, but haven’t had the time or energy to tackle my massive fireplace. That is until I discovered a secret weapon that made my DIY farmhouse fireplace makeover super simple…and the results are amazing!
This post may contain affiliate links, which means I may earn a commission if you click a link (at no additional cost to you). Thanks for your support!

Here it is! My lovely, huge, out-dated brick fireplace. I’ve wanted to do something different with this monstrosity since we’ve moved in, but the thought of painting this bad boy was a little overwhelming. So, it’s sat there in all its brown glory for seven years. Until I went on a Fixer Upper binge and just had to take on the challenge.
I did a little research and, thanks to my best friend Pinterest, discovered this amazing product from Valspar called Limewash Glaze. You can only buy it at Lowe’s. A small 16-ounce jar will run you almost $13, but the good news is, a little bit goes a long way. I used three jars on my DIY farmhouse fireplace makeover. Just as a point of reference, my brick fireplace is 7 feet wide by 12 feet tall!
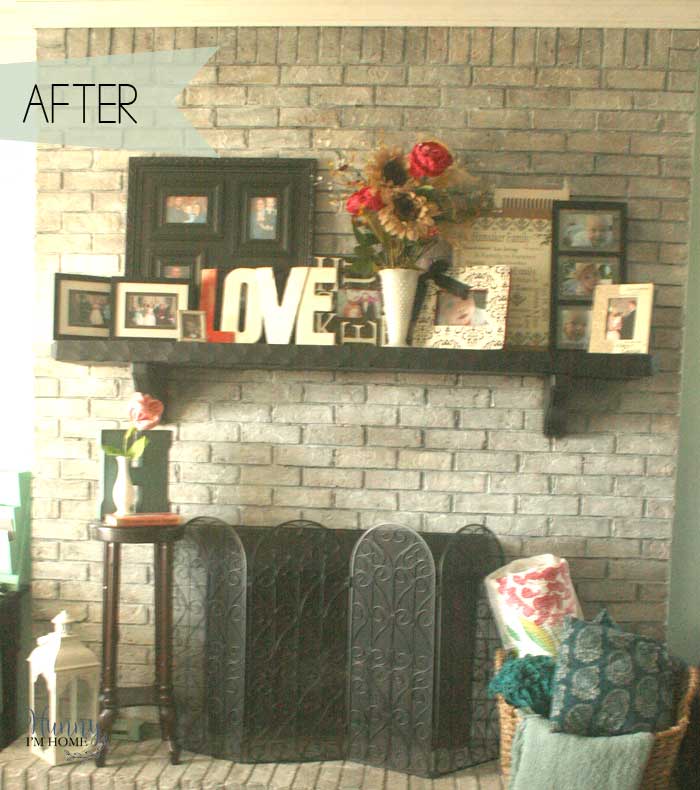
And this beautiful fireplace is the final product. And the best part about this DIY farmhouse fireplace makeover is that it was super simple! The limewash glaze has a watery consistency, similar to whitewash paint. The instructions on the jar advise using a wet lint-free cloth to spread the glaze on your surface, but my brick was way too porous for that.

Instead, I used a cheap paint brush for the first coat to create a base on the brick. This step went pretty quickly because I wasn’t concerned about the strokes being even or anything. After the first coat was dry, I went back over the fireplace with a very small brush to fill in areas of the mortar that were missed in the first coat.

After my touch-ups dried, I started my second coat. This time, I ripped up an old t-shirt and dampened it with some water. I then smoothed a second coat of limewash over the top with the dampened shirt. I followed that coat with some touch-ups with my small brush again.

And then I was finished! I can’t believe I waited so long to make this simple update. I’m in love with the results. The fireplace went from an outdated, ugly brown eyesore into a beautifully rustic accent that brings my living room together. I’m so happy I decided to tackle this DIY farmhouse fireplace makeover.
Do you have a DIY project that you’ve been putting off? Tell me about it in the comments!
If you like this post, you’ll probably like these:
 |
 |
 |
| Our DIY Renovation: Demolition |
19 Amazing DIY Farmhouse | 12 Ways to |
Emily is a midwestern mom of two boys. She loves all things DIY — from home renovations to kids birthday party planning. Whether she’s making a new farmhouse craft for her home or helping her kids with a cool activity, you can bet she’s in the middle of some kind of DIY project (or three) right now!


Thank you for sharing! It definitely makes the fireplace look a lot more rustic and gives it an old-school charm. I’m just wondering though- is the limewashed brick easy to clean? Is it easier to clean than, say, sealed brick? Can you use a sealant on limewashed brick? Thank you again!
Those are great questions Allyson! My bricks were not sealed to begin with, so I typically just used my vacuum to clean the fireplace brick. It’s just as easy to clean with the limewash on it. I don’t see any reason why you wouldn’t be able to seal the brick after you limewash, though.
Your fireplace looks beautiful! I have wanted to makeover mine as well however am concerned because my bricks are glazed. Are yours glazed as well? If not, any pointers on covering this type of brick?
Thank you!
I’ve been thinking of tackling my dark red/black brick (with black mortar) fireplace for some time, but I’m SOOO nervous!!! After a few success stories from friends then seeing your post, I think I can finally jump in and do it! I notice your mortar was also dark/black. Did you have any issues getting it to cover those very dark areas nicely and therefore blend easily with the bricks? I am NOT wanting a “white” or “painted” look but rather that varied shades of white/gray with undertones from the brick itself. Thank you for the inspiration!
It took me a while to work up the courage to do mine too! The only real issue I had was getting the paint brush into the crevices to get to the mortar. I ended up using a tiny paint brush to touch up the spots that I couldn’t get to withe the regular brush.
Wow, it looks amazing!
How long did it take you from start to finish?
This took me three or four days Melanie, but I had a baby at home at the time…so I had to take lots of breaks! You could definitely get it finished in a weekend. The only thing that takes a while is waiting for the limewash to dry between coats.
Looks beautiful, but as per a previous commenter my bricks have been glazed, any suggestions how I could tackle those anyone? Many thanks Gaby
Do you use this fireplace? Was wondering if it held up to the heat!
What color did you use? It almost looks grey and that’s what I wanted
I used a limewash glaze on the brick. My bricks were tan and brown to begin with, so that’s probably why the color turned out a little bit grey.