How to Create a Basic Floor Plan in Photoshop
Since my husband and I aren’t architects, planning for the arrangement of our addition has been a learning process. He can draw with a pen and paper, and I’m more inclined to use my graphic design skills to get the job done. So, we worked together to figure out the size and placement of each room. Then, I took to Photoshop to create a basic floor plan.
This post contains affiliate links, which means that if you click on one of the product links, I’ll receive a small payment.
First, he sketched a rough draft of the design on a piece of paper, then I used Photoshop to make a graphic rendition of the design for our building permit. In another tutorial, I’ll talk about adding interior design elements into the basic design, but for now, let’s talk about how to get an AutoCAD-inspired floor plan in Photoshop. Also, just a note: I’m working in Photoshop Elements, but I think in this case, the steps should apply to traditional Photoshop as well.
Creating Rooms in Your Floor Plan
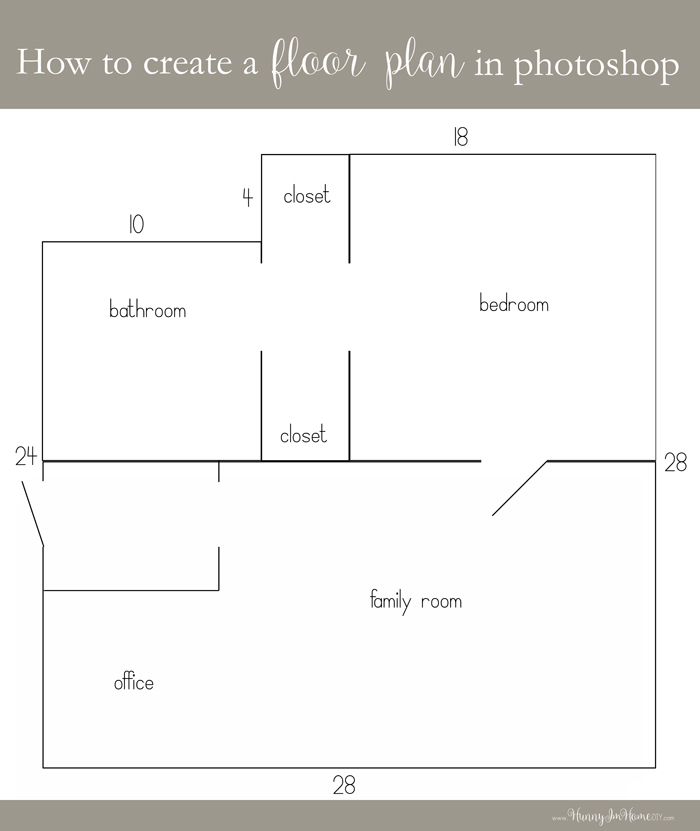
To make things simple on myself (because numbers aren’t my thing), I simply converted feet to inches within my design. So, to start, I made a canvas that was slightly larger than the total square feet of the addition. In my case, our addition will be 28 feet by 28 feet, so I made my canvas 32 inches by 37 inches.
One thing that I hate about drawing in Photoshop is the fact that you can’t create a shape with an outline using the shape tool. Instead, you have to do a slightly annoying workaround to create the hollow boxes we’ll need for our floor plan.
I started with the largest room in our addition, the office/family room, which measures 28 feet by 14 feet. To create the box, I first created a new layer, which I labeled “Family Room,” then picked the selection tool from the toolbar. To ensure the box is the right size, I chose “fixed size” from the mode menu at the top of the screen and typed my measurements in the following box.

Now we have a 28 inch by 14 inch box, but that box still needs an outline. To get that line, just select “Edit,” then “Stroke (Outline) Selection…” Another box will pop up where you can choose your outline color, size, and placement. I chose 10 px, black, and center.
 I completed the same steps for each additional room in the floor plan. To edit the size or placement of each room, simply click on its layer and use your mouse or arrow keys to move and adjust. This is why it’s so important to create a new layer for each room. Without these layers, there’s no way to make adjustments after the boxes are drawn!
Adding Doors to Your Floor Plan
After drawing boxes for each room, it’s time to add doors. I started with the bedroom, closet and bathroom area. We’re planning on adding barn doors to the closet entry, with a four-foot opening between the bedroom and closet, as well as the closet and bathroom. To ensure everything was straight and centered, I switched to grid view, with each square on the grid equaling one inch. (Choose “Grid” from the view menu to add a grid to your document.)
 Using the selection tool, I made a six inch by four inch box to create an opening in the bedroom, closet, and bathroom walls. After selecting the area, I clicked the layer corresponding to each room and hit delete. This removed the part of the wall within the selected area for each layer. So, I’m left with an opening for the doorway in each room of the floor plan. Since we’re using barn doors, there won’t be door opening in that spot, so I’m not adding it in these rooms.
 To add doors from the bedroom to family room and exterior to family room, I used the selection tool again to delete the walls, then used the line tool to create doors. I also used the line tool to draw walls for the mud room area, which will be 8 feet by 6 feet. Each door in the floor plan is a standard 3-foot opening.
 Finally, we get to add our labels and measurements. Just use your text tool, select a font (I used Simple Print), and label each room. Then, add exterior measurements to each exterior wall. To save your floor plan as a PDF, flatten your image and save!

Emily is a midwestern mom of two boys. She loves all things DIY — from home renovations to kids birthday party planning. Whether she’s making a new farmhouse craft for her home or helping her kids with a cool activity, you can bet she’s in the middle of some kind of DIY project (or three) right now!


Thanks for the tips; this was very helpful!